Thursday, 9 April 2020

We Will Remember Them Stepper Card - CCDT 1620


'We Will Remember Them'
Scene Stepper Card


Hello Everyone,

Welcome to my next project for Couture Creations using the 'Lest We Forget' Collection.

This collection has some wonderful dies and it is only fitting that they should be on the stage for all to see.

Anzac day is a day to remember how our mighty men and women sacrificed their lives to give us all a better way of life.  


I hope it inspires you to give it a go.


My finished Scene Stepper card

I started by making the stepper card.  This is the template for the card.  I trimmed an A4 card back to 8" x 11.5" to make it easier to work out the measurements.


Views of the base card


Elements I used from Couture Creations on this project.

With the row of poppies die, I cut extra flowers from red glitter card and glued them on top of the kraft card die-cuts then randomly stamped the green ink around the stem area.  I used both red and black glitter card and brass metallic card for the small poppies. I created a mix of different small poppies by interchanging the centres.  The large poppy was cut from red glitter card and I added the outline of a small  brass card poppy in the centre. 

All the elements prepped ready for assembly.

I cut 3 slots at different angles into the stage area for the acetate strips that hold the poppies and cauldron.


A closer look at how I attached the acetate strips to underneath the stage.  Once I had the elements in place, I cut the underneath part in two, folded them in opposite directions and added tape across these legs to secure them to the stage floor.

I off-set the 2 'Eternal Flame' die-cuts, glued them together to give a more dimensional effect, then attached them to the acetate strip.  Make sure you add the glitter card flame to the strip as well.


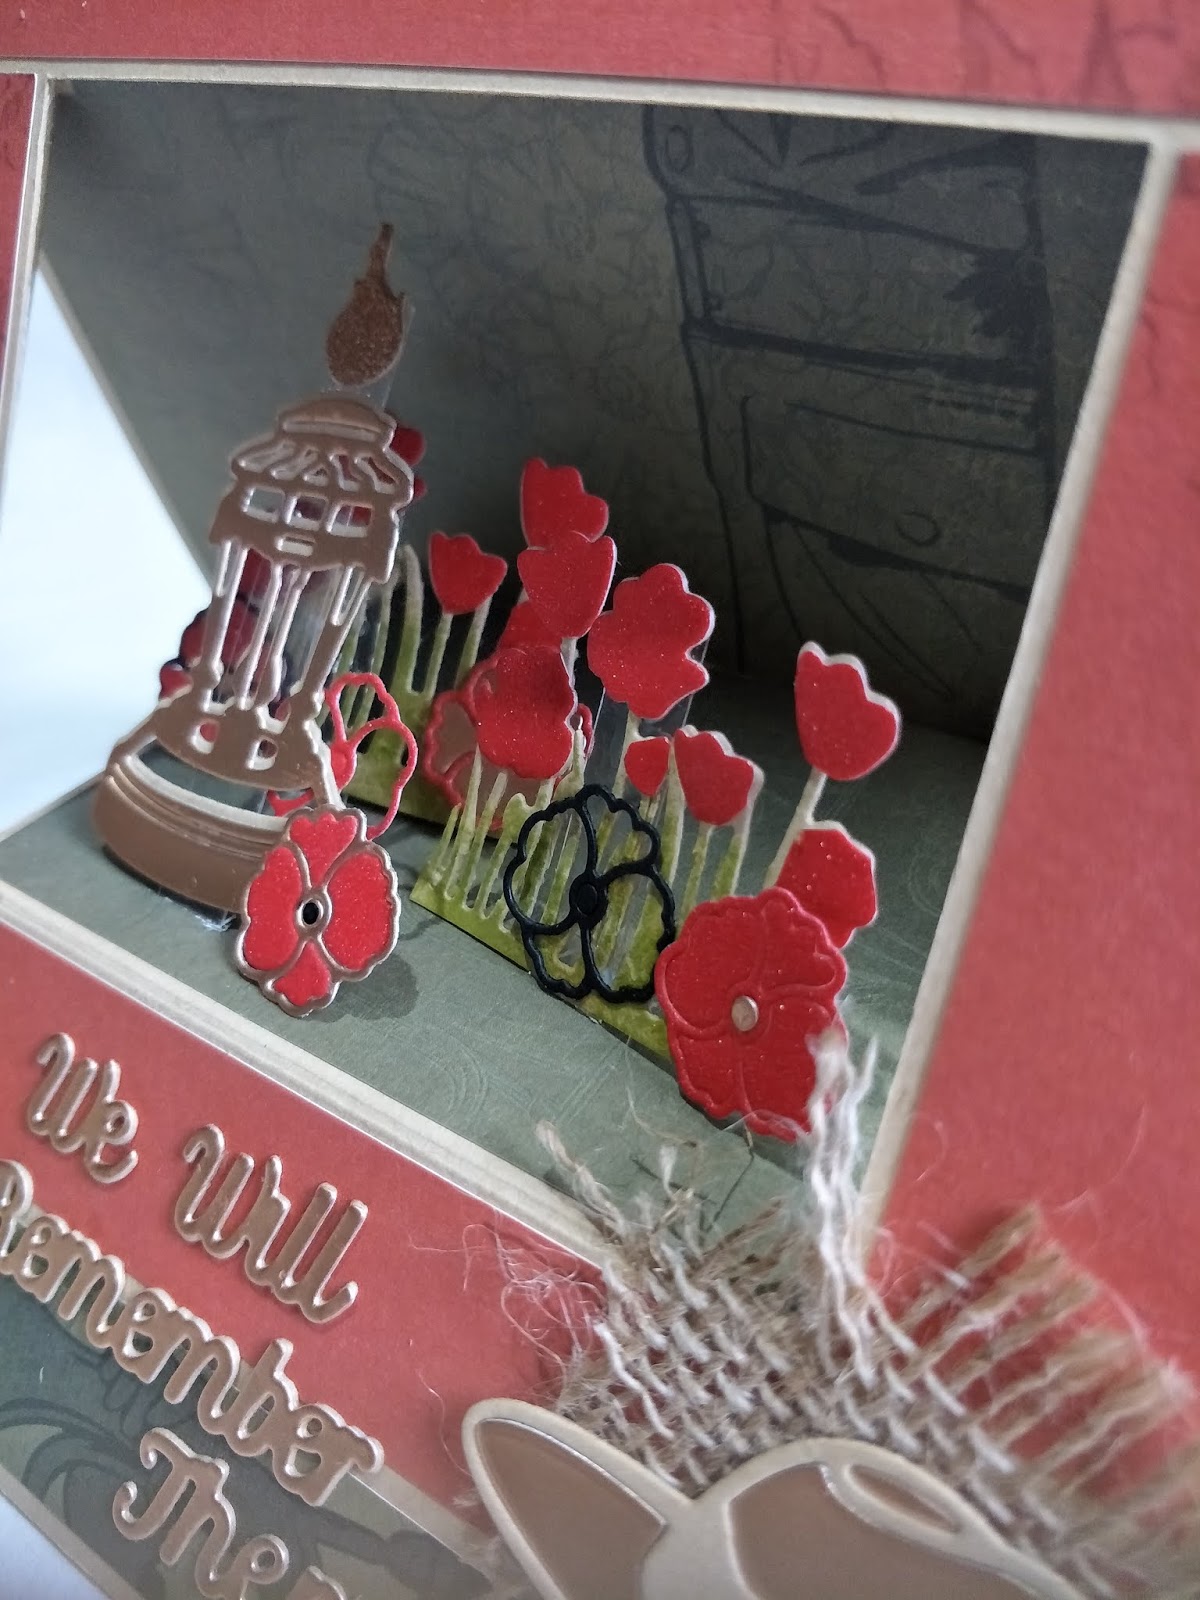
A closer look at the elements that have been slotted into the stage with acetate strips

The card folded flat

A sideways shot


Couture Creations Products Used:-


CO727167-  A4 Bright Red Glitter Card - 250gsm 
CO727172- A4 Copper Glitter card - 250gsm
CO725408 - A4 Matte Bronze Mirror Foil Board
CO727681- Die - Layered Poppy set - 2pc  
CO727683- Die - Poppy Border 
CO727385- Die - Eternal Flame set - 2pc
CO727686 - Die - Slouch Hat set - 2pc
CO727688 - Die - We Will Remember Them
CO726878- Die - Frames Nesting Negative Circles
CO726520- GoPower & Emboss Machine (Die-Cutting Machine)
CO725038- Scissors
CO726809- Precision Craft Knife


Other Products Used:
A4 Kraft Card, Acetate strips, Burlap cloth, and Glue.


I have included a short video showing the card at all angles and folding it flat.


To find a store near you that stock these Couture Creations products, click on the following link:-

My Blog Link is:  cardcraftkaylee.blogspot.com

Thanks for joining me...


Wednesday, 1 April 2020

MSL Wedding Day Wallet and Box - CC DT 1420

Wedding Day
Wallet Card &  Box Envelope


Hello Everyone,
Welcome to my next project for Couture Creations using the
'My Secret LoveCollection.

I created a Wedding Wallet card and a No-Glue Box Envelope.  

A lot of Weddings these days ask for 'Money Gifts' instead of a gift of your choice.  So for a special occasion, it's nice to give a special "Hand Made' gift to wrap your money in.


I hope it inspires you to give it a go.


These are my finished projects, the Wallet Card (at the top) and the 'Box Envelope'.  


A view of the open Wallet Card.  The bottom pocket fits our Australian money notes.  Your greeting words can be added to the centre panel, adjacent to the Heart. The Wallet card measures 4" x 6 1/8".  The Envelope Box measures 4 1/2" x 6 1/4" x 3/4".


Couture Creations product used.


All the components prepared ready for assembly.
Box Envelope Template

This is the template to create the 'No-Glue' Box Envelope.  I found inspiration on a Youtube link by 'Pootles Papercraft' and modified it.  These are the things I wanted in a box. I wanted it to fit my Wallet Card with maximum height.  I liked the idea of no-glue as that enabled you to store these flat until you wanted them.  It had to be made from an A4 sheet with folded edges to give support and to be visually tidier with no gapes on the sides.  It had to have 2 locking parts because it was going to hold money.  After many attempts I was happy with this template.


On the template, I ear-tagged a section on the front panel of the box where you could add an inlay die cut - so I added one.  This die was from the 'Peaceful Peonies' collection.  The size of the area was determined by the underneath folds - I didn't want to see them through the die-cut.

The Patterned paper front panel has to have a circle cut out of it for the die-cut to show through - I measured from the top and side edges to get the position and then used the actual die to draw around the outside edge of the circle, then I just cut that circle out.  Glue panel to front of box.

The 2 Heart dies were taped together and then run it through the die cutting machine.  I cut 2 from the Silver Glitter card and one from the foam sheet.  I mounted the foam cut to one of the glitter card cuts and glued a ruffle of cheesecloth/muslin to the inner side before mounting it to the front panel over the in-lay die-cut.  The other heart was glued to the 'Together Forever' sentiment that went onto the inside centre panel of the wallet card.

Wallet Card Template


This is the template I created for the Wallet Card.  Once again I needed it to fit my criteria.  It needed to be made from and A4 sheet, be wide enough for a money note to fit, have a pocket for the money, a place to write your greeting words and a front flap large enough to decorate.

Here I used the leaf die cut from patterned paper to create a 'lace-like' trim for the front flap.  I glued the leaves on the front flap before adding the front patterned paper panel.  This  concealed the attachment of the leaves and is pleasing to the eye from both sides of the edge. 


The Wallet card fits just nicely in it's box.
On the front panel, I heat embossed the stamp 'Wedding Day' with the Silver Sparkles embossing powder.

You can see from this photo where I placed the heart and butterfly embellishments.  I used a mix of glue and foam tape to mount these.  I added a small strip of re-positional tape to the underside of the front flap of the wallet card to hold it down.

The finished projects with a darker background to give you another view with more contrast.


Couture Creations Products Used:-

CO727587-My Secret Love Collection 12-x-12 Pad Sheets- 1A & B,8A,11A
ULT200077- Cardstock Precious- 250gsm
CO727166- A4 Silver Glitter Card - 250gsm
CO727628- Stamp My Secret Love - Wedding Day - Wedding Day
CO72378-  Heat Gun
CO726520- GoPower & Emboss Machine (Die-Cutting Machine)
CO721964- Foam mounting tape 12mm x 4m
3L01653-  Repositionable Tape
CO725038- Scissors
CO726809- Precision Craft Knife


Other Products Used:
2 Sheets of A4 Ivory Card, Versamark, Cheesecloth/Muslin, 2mm foam sheet and Glue.


I have included a video link of how I cut and folded these two projects on Youtube -
My Secret Love Wedding Wallet Card and Box Envelope Instructions

NB: (I am no video-maker expert as you will see.  Please excuse the auto-focus issue but you will get the gist of what to do -I'm working on solving it)


To find a store near you that stock these Couture Creations products, click on the following link:-

Thanks for joining me...


Friday, 27 March 2020

March 2020 Challenge - ATC (Set of 3 Artist Trading Cards)

March 2020 Challenge - Set of 3 ATC's
(Artist Trading Cards)

This is my submission to the Couture Creations Monthly Challenge
I used elements from the 'Gentleman's Emporium' Collection

Friday, 13 March 2020

Falling in Love Folio - CCDT - 1320


Hello Everyone,
Welcome to my next project for Couture Creations using the
'My Secret Love' Collection.

I created a photo folio with a pop-up page.  

I was working on a 'Paper Piecing' technique - where you place your photos where you want them then fill in all the remaining areas with tiny cut strips of patterned paper in any arrangement you like, leaving a small margin between each piece.  I just couldn't help myself, I had to add a pop-up element as well.

I hope it inspires you to give it a go.


'Falling In Love - Folio' Project


Removing the heart lock and lifting up the top flap

Folding down the front acetate flap and showing a heart matt in the oval insertion point 

Folding down the Oval page to reveal 2 pages ready for more photos

Opening the top page to reveal 2 more pages for photos.  I left these pages free so any size photos can go where ever you want to place them.

Once these 2 pages open out you see the photo layout with each measurement.  Once you place your photos down, you begin the process of 'Paper Piecing' - which is just trimming down paper pieces of different sizes and different papers to create a display.

Opening the bottom flap exposes you to a pop-up with side slots.  I have only partially die-cut a small butterfly on the matt on the slot at the top right, just to show you that you could incorporate an accompanying element to tie in your theme. 


This is the A4 template I used for the mat sizes - I copied this twice for the layout.


These are the components that I used to create the heart lock - 2 die-cut heart frames (I used the 2 larger frames together from the Negative Hearts frames to get the outline hearts) I embossed the sentiment on acetate with white embossing powder then cut the acetate just a bit smaller than the heart shape, then glued it between the 2 heart frames.  I put glue on the leaf die-cut only where it touched the frame, not onto the acetate as I didn't want any glue showing through from the other side.

A closer look at the heart - with the heat embossed sentiment, gemstones and glitter card leaf.  I did put some glitter pen over the embossed inner heart, but it doesn't show up in the photo.


I used 6 sheets of A4 Ivory card for the pages.  The pages were:-
A = Top flap - 5 1/2" x 4 1/2" - this included 2 x 1/2" folds
B = Top Left page - 11" x 8 1/4" - this included a 1/8" fold on the bottom right half (I thought about it later and I probably would have added a hinge instead of the 1/8" fold as I think that would have been stronger)
C = Top Right page - 11 5/8" x 8" this included a 1/2" and a 1/8" fold on the left side
D = Bottom Pop-up page - 11 1/8" x 8 1/4" - this included a 1/8" fold down the centre and 2 x 1/8" fold on the top left half
E = Front Bottom Flap - 2 pieces 5 1/2" x 7" this included a 1/4" then 1/2" fold at the bottom.
On each of the hinged folds I cut an angled corner so the joins looked better once glued.
This was my pop-up template.  It measured 9" x 5 3/8".  The outside frame was 1/2", the pages were 1" from that frame and from the centre fold.  You can see where I made the cuts and the folds from the top picture.
The pop-up cut and folded


This is a look at all the folded parts


I folded the pop-up then positioned it so it was centred and was contained within the page when it was closed.

To get a perfect alignment of the slots, put both paper pieces together in opposite directions and die-cut them together.  I die-cut 4 slots from the glitter card and glued them over the paper pieces slots.


To make it easy to glue the patterned paper, I glued down half of the Pop-up - added the paper pieces.  I added glue only to the frame part,then folded the pages together to get a perfect placement of the pop-up. I then glued the other half of the paper pieces to that side.


A better view of the pop-up with all the paper pieces in place


To create an insertion point, I used my craft knife and cut around the flowers.  I then slipped a piece of scrap paper between this cut and traced around the cut line.  I used this guide to cut the same shape with a small margin from the Precious and Cantalaupe cardstock.  

I inked the edges of both of these cardstocks with Salmon ink. I glued the Precious behind the flowers and the Cantalaupe onto the back cut - this creates a pocket for a photo.  I added glitter pen to the centres of the flowers and around the edge of the precious cut.
A Sideways view to show the heart locking element


Another option of adding a second heart lock

Couture Creations Products Used:-

ULT200077- Cardstock Precious- 250gsm
ULT200056- Cardstock Cantelaupe 250gsm
ULT200028- Cardstock Peridot 250gsm
CO724317A-A4 Acetate Sheet
CO727628- Stamp My Secret Love - Wedding Day - Falling in Love
CO726809 -Precision craft knife
CO72378-  Heat Gun
CO726520- GoPower & Emboss Machine (Die-Cutting Machine)
CO724987- Embossing Powder - White-super fine


Other Products Used:
6 Sheets of A4 Ivory Card,Versamark, Glimmer pen and Glue.


I have included a video link of how this folio folds out.
Youtube -
https://youtu.be/BDjZ8BF7oAg


To find a store near you that stock these Couture Creations products, click on the following link:-

Thanks for joining me...