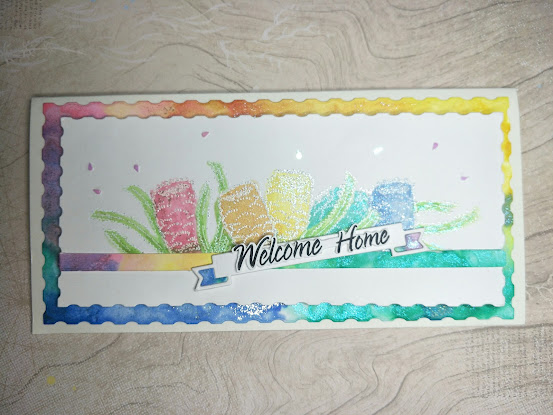
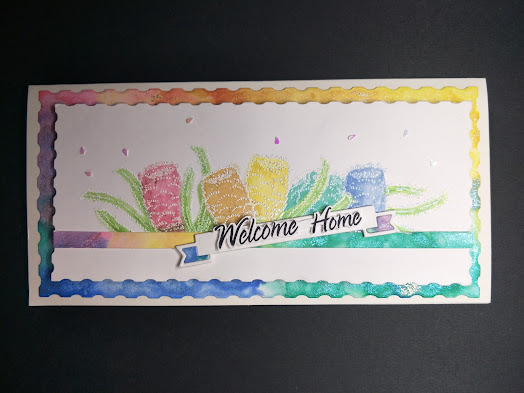
Welcome Home Banksia Card
Welcome again! Still loving the 'glitter'. This time I used the Alcohol inks with glitter. These elements are from Couture Creation's new collections Homely Florals.
I was inspired by Adriana as to how she used stamps in a different way than normal - ie. part of the stamp, so I had an idea to use the accessory stamp that came with the stamp set instead of the main stamp.
I also thought, why stay with traditional colours of what that flower should be so I used a rainbow of colours.
I used a recently retired slimline card die and cut out 2 panels.
Next I started by making a few stamped images so I could use them as a mask. When masking, the one thing you have to remember is that the image you want to be in the fore-front must be stamped first. You then mask that and all the other images are stamped over the mask so when it is finished it looks like that are behind the fore-front image.
I run a strip of double sided tape along the card panel about half and inch from the bottom and then I stamped the images with the embossing ink pad and heat set it with the white embossing powder. Once I completed that I placed a colour of the alcohol ink onto an acrylic block, used a paint brush and coloured the flowers. Note, I used photographic paper and as you will see in one of the photos, it bleed a bit - but as with all things in craft, it was not a mistake but just an opportunity to see what you could do to fix it - I just waited for it to dry and painted green ink over that area and to me it looks ok.
The back panel was covered with the same alcohol inks I used for the flowers. It is mesmerizing to see the glitter in the inks dance around while you are working with them - so pretty. Once all was dry, I measured the length of the front panel and cut a strip from the back panel in a diagonal direction - this panel was going to be covered so I used it for the strip that was to go onto the front panel.
I stamped the sentiment, fussy cut around the outline of the letters, fixed foam tape to the back of it and stuck it to the die-cut banner. During the process of seeing what might work, I had die-cut the banner from a test piece of card that I had the alcohol in on, so I used the end pieces of the flag and inlaid them into the banner.
The front panel was mounted onto cardboard before placing it onto the card. Once everything was glued in place, I found some tiny sequences so I glued them randomly onto the front panel - this is where I though the tweezers were very helpful, the bent tip made it easy to see and handle.
I just wish you could see this card in real life as the shine and sparkle from the inks is gorgeous, I can't seem to capture that on photo. I enjoyed making this card. It was a bit of a test to learn new things and interesting to see how combining colours and mediums would work together. I hope this might inspire you to try new things and be pleasantly surprised as well.
Products used:-
CO728657 Homely Florals - Charming Banksia Stamp
CO728660 Homely Florals - Smile Die set (banner)
CO728538 Deck the Halls - Scalloped Rectangles Tall Card Nesting Die set (Retired)
CO724848 Tall Cream Card & Envelope
CO727181 Photographic Alpine White smooth cardstock
CO727859 Alcohol Ink Blower
CO727337 Alcohol Ink Blending Solution
CO728347 Alcohol Ink Glitter Accent - Pumpkin
CO728348 Alcohol Ink Glitter Accent - Sunflower
CO728349 Alcohol Ink Glitter Accent - Apple
CO728351 Alcohol Ink Glitter Accent - Turquoise
CO728486 Alcohol Ink Golden Age - Fuchsia
CO728487 Alcohol Ink Golden Age - Cobalt
CO721985 Double Sided Tape - 6mm
CO721962 Foam Mounting Tape - 6mm
CO724963 Embossing Powder - Basics Glacier White - Super Fine
CO728278 Embossing Ink Pad
CO728095 Ink Pad - Matte Jet Black
CO728511 All Purpose Art Glue - 60ml
Tools used:-
CO726520 Go Power & Emboss Machine
CO723978 Multi-Purpose Heat Tool
CO727381 Precision Stamp Press
CO727162 Precision Tweezers
CO726809 Precision Craft Knife
CO721957 Self Healing Cutting Mat
CO728522 Scissors - small Detailing
Other Products:-
Paint brush, ruler, sequences, and cardboard backing.
Thanks for stopping by ...
You can see me over on my personal blog here:-