Wednesday, 12 January 2022

Banksia Thanks Card

 Banksia Thanks Card


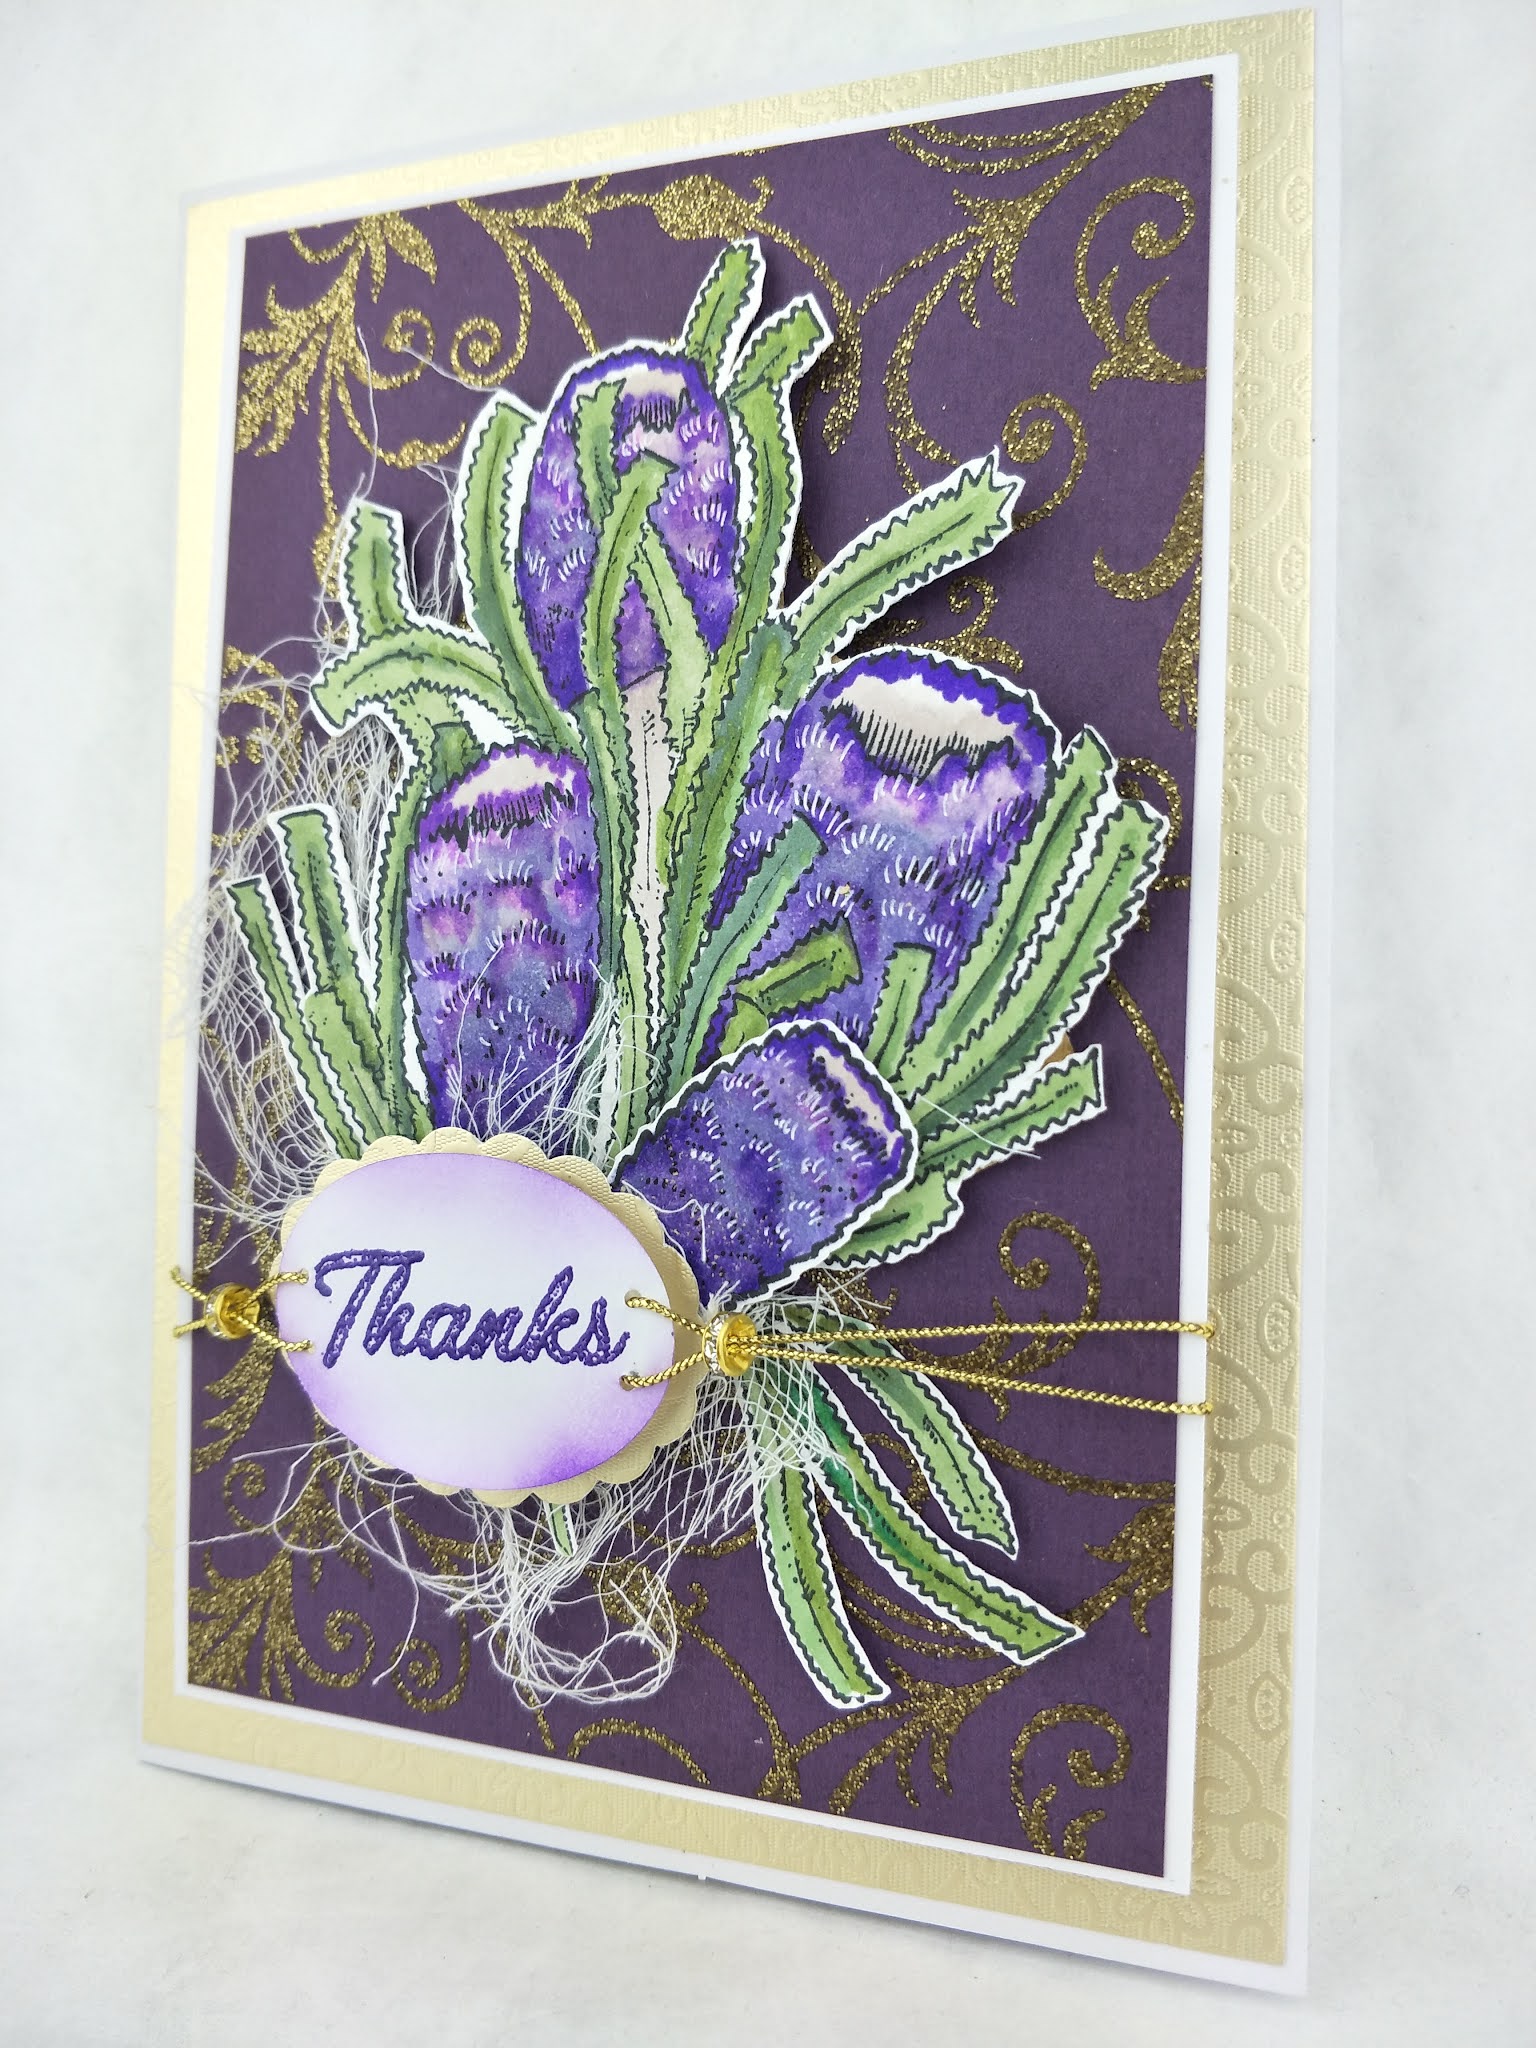
Welcome again! Still loving the 'glitter'.  The gold glitter embossing powder was used on this very pretty background stamp.  These elements are from Couture Creation's new collections Homely Florals and the 5x7 Background stamp sets - Release 1.

I created this card around a colour theme of purple and gold.  I don't think the banksias are naturally this colour but this was the exciting thing to see if they looked good anyway.  

So I started by heat embossing the background stamp and the sentiment stamp.  To stop any warping of the card I put a heavy pile of card on top of the embossed image and left it there overnight.

The banksias were created by stamping the stamp with the black outline ink onto white photographic paper and coloured it with the alcohol markers.  I am a beginner at colouring with markers and I have found the colourless blender is my friend - it seems to give a range of colour tones that blend out my inexperience.  Once it was coloured, I added some of the new 'golden age' to the base of the flower - that just gave a lovely touch of gold sparkle.  I then fussy-cut out the image and backed it with cardboard. After I had finished the card, I added some white stroke marks on the flowers to bring them forward and to highlight the petals.

I trimmed the mat pieces to a size I liked and glued the gold card directly to the card front.  I added cardboard behind the front white mat, glued the embossed mat to it, then added the stamped image on top.  I had to have this in place before I could add the sentiment tag.

I created the sentiment tag with oval punches.  I inked the edge of the sentiment one, punched 2 holes either side and threaded the gold string ribbon through them, added a couple of foam squares between them, threaded the ribbon through a gem bead before securing the ends behind the front mat.  I then glued the front mat arrangement to the card front.  

The card seemed a bit darkish so I added a bit of white muslin under and in the arrangement to lighten it and give a bit of depth and interest.

I enjoyed making this card.  It was a bit of a test to learn new things and interesting to see how combining colours and mediums would work together.  I hope this might inspire you to try new things and be pleasantly surprised as well.


CO725815     5x7 White Card & Envelope
ULT200086    Cardstock - Royal Midnight
CO725405     Mirror Board -Matte Gold Damask
CO724977     Embossing Powder - Amethyst Metallic Finish
CO727181     Photographic Alpine White Smooth card 
CO728409     Background Stamp Sets - Release 1 - New Growth
CO728657     Stamp & Colour Acrylic Stamp Set - Homely Florals - Charming                                 Banksia
CO728475     Outline Ink Pad - Black
COAP0          Alcohol Marker - Colourless Blender
COAP5305    Alcohol Marker - Greek White
COAP377      Alcohol Marker - Olive Green
COAP7493    Alcohol Marker - White Lotus Leaf
COAP7538    Alcohol Marker - Rock Ash
COAP2265    Alcohol Marker - Hyacinth
COAP271      Alcohol Marker - Lavender
COAP2715    Alcohol Marker - Hydrangea
CO728485     Alcohol Ink - Golden Age - Amyethyst
CDEIPU010  Dye Ink - Blueberry Purple
CO724977     Embossing Powder - Amethyst Metallic Finish
CO724988     Embossing Powder - Gold Super Sparkles
CO728278     Embossing Ink Pad
CO725662     Goodbye Static Pad
CO727948     Blending Brush - Medium
CO728462     Handy Clips
CO726327    Glue - White Tacky
CO724824    GoCut and Emboss die cutting machine
CO72738      Precision Stamp Press 

Other Products:-
White pen, gold string ribbon, 2 rhinestone beads, muslin, oval punches, scissors, cardboard backing and adhesive foam squares.


Thanks for stopping by ...


You can see me over on my personal blog here:-


Saturday, 1 January 2022

Merry Christmas Cards


Welcome again!   This time using Couture Creation's new Christmas collection 'Deck the Halls'.

 This is an A6 size card and it can be complemented also with the lovely printed envelopes that have also been released.  

I made 2 cards using the one paper pad sheet with complementing coloured cardstock.  I used the envelope as a guide to chose the ephemera pieces for the cards.  I started by cutting a piece of copy paper slightly smaller than the coloured cardstock matting and laid it on top.  I then embossed the edges of the coloured cardstock with glitter embossing powder.  Once all the die cutting was done, I assembled the cards adding a few trimmings to the arrangement and glued it all together.  I popped foam tape under the focal pieces.  There is just so many lovely ephemera pieces in this collection that we are spoilt for choice.


CO723893    Envelope - White A6
ULT200031   Cardstock - Cypress Pine
ULT200044   Cardstock - Cinnamon
ULT200068   Cardstock - Carnelian
CO726219    Mirror Board - Silver Damask
CO727181    Photographic Alpine White Smooth
CO728532    Tall Nesting Die set - Happy Holidays (Branch)
CO728552    Die Cut Shapes - Winter Wishes - Wreath
CO728562    6x6 Paper Pack - Spirit Melodies - Sentiment
CO728564    6x6 Paper Pack - Winter Dazzle
CO728563    Die Cut Emphemera - Christmas Tree & Presents
CO728568    Mini Die - Pine Branch
CO728570    Mini Die - Rustic Christmas Tree
CO728546    Christmas Envelopes
CO728278    Embossing Ink Pad
CO725016    Embossing Powder - Mixes - Irridescent Superfine Glitter
CO728511    Glue - All Purpose Art Glue
CO726770    Nesting Square Set (Retired)


Other Products:-
Red Thin Ribbon, Red Beads, Bakers Twine, Adhesive Gems and foam tape.


Thanks for stopping by ...


You can see me over on my personal blog here:-


 Christmas Card & Envelope


Welcome again!   This time using Couture Creation's new Christmas collection 'Deck the Halls'.

 This is an A6 size card and it can be complemented also with the lovely printed envelopes that have also been released. I used the envelope as a guide to choose the ephemera pieces for this card.   

I stamped the wreath onto photographic paper and coloured it with the dye inks and a water brush, then fussy cut it out into 2 pieces to form an oval wreath.   I created the silver frame by die-cutting 2 different sized rectangle dies together at the same time.  I used a polka dot embossing folder for the backing mat, as to me it resembled snow.  Once all the die cutting was done, I assembled the card.  Foam tape was added behind the focal pieces and the frame.  There is so many lovely ephemera pieces in this collection. 


Couture Creations Products:-

CO723893    Envelope - White A6
ULT200019   Cardstock - Ice Crystal
ULT200031   Cardstock - Cypress Pine
ULT200032   Cardstock - Shamrock
ULT200040   Cardstock - Chocolate
ULT200068   Cardstock - Carnelian
CO727166    Glitter Card - Silver
CO727181    Photographic Alpine White Smooth
CO728505    Outline Stamp - Merry Wreath
CO728532    Tall Nesting Die set - Happy Holidays (Branch & Tree)
CO728550    Die Cut Shapes - Christmas Joy - Sentiment
CO728563    Die Cut Ephemera - Christmas Tree & Presents
CO728568    Mini Die - Pine Branch
CO728570    Mini Die - Rustic Christmas Tree
CO728542    Christmas Envelopes
CO728511    Glue - All Purpose Art Glue
CO726770    Nesting Square Set (Retired)
CO728387    Water Brush
CDEIPU021 Dye Ink - Grass Green
CDEIPU024 Dye Ink - Olive Green
CDEIPU026 Dye Ink - Pine Green
CDEIPU036 Dye Ink - Dark Grey

Other Products:-
Embossing folder and foam tape.


Thanks for stopping by ...


You can see me over on my personal blog here:-


 Peace, Love & Joy  Gift Tag Cards


Welcome again!   This time using Couture Creation's new Christmas collection 'Deck the Halls'.

I wanted to incorporate a gift card to a Christmas card so I created this Pocket Card.  This is an A6 size card and it can be complemented also with the lovely printed envelopes that have also been released.  

I made 2 cards because I cut 2 sheets in half from the paper pad and created an alternative version of the 2 papers.  I measured a gift card and made a tag and pocket to fit it onto the front.  Just to be a little bit different, I rounded the corners on each paper piece on one card.  I added a few trimmings to the arrangement and glued it all together.  On the snowman card I added a thin film of texture paste to resemble snow.   Another a gift with a gift. Cute. 


CO723893    Envelope - White A6
ULT200044   Cardstock - Cinnamon
CO727181    Photographic Alpine White Smooth
CO728532    Tall Nesting Die set - Happy Holidays (Branch)
CO728562    6x6 Paper Pack - Spirit Melodies
CO728563    Diecut Emphemera - Snowman
CO728568    Mini Die - Pine Branch
CO728543 - 7 Christmas Envelopes
CO725349    Corner Punch - Large
CO728511    Glue - All Purpose Art Glue


Other Products:-
Bakers Twine, Ribbon, Sequences, Gift Card & Texture Paste.


Thanks for stopping by ...


You can see me over on my personal blog here:-


Tuesday, 23 November 2021

Gift Tag Slider Christmas Card

Merry Christmas Gift Tag Slider Card


Welcome again! Still loving the 'glitter'.  This time using the Christmas Joy Die cut glitter framed shapes.  These elements are from Couture Creation's new collection 'Deck the Halls'.  

I wanted to incorporate a gift card to a Christmas card so I created this Slider Card.  It was a simple process of creating the slider.  This is an A6 size card and the measurements for the slide mechanism are detailed in a photo above.  To get these figures I measured the 'Deer focal piece' to get the width of the slider and also the length of a gift card to get the the length of the tag/slider.  The stamp 'Merry Christmas' had to fit into the opening as well.  To cut the front fold area into the card front, I found a rectangle die that would fit my slider and partial cut the 3 sides.  I scored a fold line along the 4th side of the cut, then allowed 1cm as a front band then divided the remainder and scored a fold line in the middle.  I attached the 'Deer' to the front of the fold.

I pulled the slide up then aligned the card front to the card base, penciled in an outline of the area available to do the stamping on.   I embossed the stamped sentiment in this area with silver embossing powder and coloured the letters with blue alcohol ink.  I then sprayed over this area with a glitter shimmer spray.  Because the 'Deer' die cut had a glittered edge, I decided to add a similar effect to the card front panel by going around the edge with an embossing pad, sprinkled glitter embossing powder on it and heat set it.  I glued the ribbon to the front, then added the double-sided tape as shown in a photo above.  Before I could attach it to the card front, I had to glue/tape the tag base to the front band.  The tag has to hold gift card so it needs to be able to slide easily but not loose.  

Once all that was in place, I just added the final trimmings

  I quite enjoyed learning how to make this type of card and I think it turned out very pretty and sparkly.  It was a gift with a gift.  

You could compliment this card with one of the lovely printed envelopes that have been released with this collection.


CO724990    Embossing Powder - Sparkles Silver/Silver
CO727166    Glitter Card - Silver
CO727177    Glitter Card - White
CO727181    Photographic Alpine White Smooth
CO728530    Outline Stamp - Merry Christmas
CO728532    Nesting Die - Happy Holidays Tall Card (Branch)
CO728564    6x6 Paper Pack - Winter Dazzle
CO728570    Mini Die - Rustic Christmas Tree
CO728549    Die Cut Shapes - Snowy World
COAP9421   Alcohol Marker - Powder Blue


Other Products:-
Silver Ribbon, Crystal Ribbon, Silver bells, Silver decorative trim, Gift Card, Glue & Double-sided tape.


Thanks for stopping by ...


You can see me over on my personal blog here:-


Sunday, 17 October 2021

Scallops and Xmas Boxes

 Scallops and Xmas Boxes Cards


Welcome again! Still loving the 'glitter', this time using glitter card and glitter glue.  These elements are from Couture Creation's new collection 'Deck the Halls'.  This set is for the 8 1/2" x 4 1/4" Tall card.

I wanted to use the new 'Golden Age' alcohol inks as well because - you guessed it, it has gold glitter in them.  To create the background card, I dropped the 3 alcohol ink colours onto a plastic sheet and then used a scrunched up piece of plastic wrap as a dauber and randomly daubed into the inks then onto the white cardstock.  I left the card for the ink to dry before die cutting the elements.  I cut a mix of pieces from the different card then divided them up between the 2 cards.  On the scalloped edges I painted some gold glitter glue.  On the white 'present boxes' and the red die cut sentiment I coated them with some clear lacquer to create a 3D effect.  

Once all the elements were ready, I backed some with cardboard or foam then glued/mounted the arrangement in place.


CO724847     Tall White Card & Envelope
ULT200066    Cardstock - Blood Red
CO727173     Glitter card - Gold
CO727181     Photographic Alpine White Smooth card 
CO728538     Deck The Halls - Nesting Die Set - Scalloped Rectangles
CO728573     Deck the Halls - Mini Die - Merry Christmas
CO727326     Alcohol Ink - Red Pepper
CO728489     Alcohol Ink - Golden Age - Cardinal
CO728486     Alcohol Ink - Golden Age - Fuschia
CO726327    Glue - White Tacky
CO724824    GoCut and Emboss die cutting machine


Other Products:-
Gold glitter glue, clear lacquer, plastic wrap, cardboard backing and adhesive foam squares.


Thanks for stopping by ...


You can see me over on my personal blog here:-


Rustic Snowman

  Snowman Seasons Greetings Card


Welcome again!  Not that I can relate to a snowman in my part of the world, but it was really fun to colour him using the vibrant new alcohol markers just released at Couture Creations.  I have to confess that this is a new technique for me and I am enjoying the process.

This is one of the exciting new 'Stamp & Colour Outline Stamps from Couture Creation's new collection 'Deck the Halls'.  It fits nicely on a 5x7 card.

I had a left over heat embossed sentiment from a previous project so that saved me a step, just had to mount it onto a label and back it with foam tape. 

The precision stamp press is wonderful for re-stamping onto the same image to get the colour depth you like.  

The colours of the snowman was a bit hit and miss, I just grabbed colours that I liked and I think it turned out lovely and bright.  The colouring technique that I used was this:- from the outside line I flicked or circled strokes in towards the centre area.  I started with the light colour first, then mid colour, colourless blender over these 2 colours, then dark colour and back to mid colour.  The colourless blender may be used after the coloured area is finished or if it blended ok, I didn't use it.  For the twirls in the air, I painted them with a water brush with a mix of 2 pigment powders and a bit of water.  The photos don't seem to pick up the lovely pearly sheen.  

To finish, it was just a matter of trimming the image and matting it onto the card front.


CO725815     5x7 White Card & Envelope
ULT200027    Cardstock - Chrysalis
ULT200066    Cardstock - Blood Red
CO724994      Embossing Powder - Brights - Candy Red
CO725537     Mix and Match Pigment - Pearl White
CO725540     Mix and Match Pigment - Silver Grey
CO727181     Photographic Alpine White Smooth card 
CO728506     Stamp & Colour Outline Stamps - Rustic Snowman
CO728475     Outline Ink Pad - Black
COAP0          Alcohol Marker - Colourless Blender
COAP187      Alcohol Marker - Geranium
COAP205      Alcohol Marker - Pale Red
COAP123      Alcohol Marker - Melon
COAP142      Alcohol Marker - Fresh Yellow
COAP2727    Alcohol Marker - Bright Blue
COAP9421    Alcohol Marker - Powder Blue
COAP2283     Alcohol Marker - Milk Green
COAP354       Alcohol Marker - Pale Green
COAP356      Alcohol Marker - Grass Green
COAP006      Alcohol Marker - Black
COAP535      Alcohol Marker - Steel Grey
COAP430      Alcohol Marker - Grey
COAP7546    Alcohol Marker - Dark Slate
CO728278     Embossing Ink Pad
CO725662     Goodbye Static Pad
CO727948     Blending Brush - Medium
CO728462     Handy Clips
CO726327    Glue - White Tacky
CO724824    GoCut and Emboss die cutting machine
CO72738      Precision Stamp Press 
CO728387    Water Brush

Other Products:-
 Cardboard backing and adhesive foam squares.


Thanks for stopping by ...


You can see me over on my personal blog here:-